Saturday 21 April 2012

How To Remove Error Deleting File or Folder

It is a very common and annoying message that the file or folder you are trying to deleted cannot be deleted or thependrive cannot be removed as it is used by the system.In this tutorial I will show how to remove your pendrive or delete the files and folders if you get such an error.This error has various flavours and it can be of any of the following types:
  • Cannot delete file: Access is denied
  • There has been a sharing violation.
  • The source or destination file may be in use.
  • The file is in use by another program or user.
  • Make sure the disk is not full or write-protected and that the file is not currently in use.

1. Download and Install Unlocker.Click Here
2. Right click on the pendrive or file or folder that has to be removed or deleted.Now, Click on the Unlocker
 3. Now it will show all the processes that are using the file or folder or Pendrive.
4. Click on the Unlock All and you are done.Now you can delete the file or folder or remove the pendrive.
Enjoy Frnds , any problem ? comment on please.

Runtime Error r6002 Floating Point Support not Loaded – Repair!


Runtime error r6002
The first thing I can say about Runtime Error r6002 Floating Point Support not Loaded is that it can become nothing but a pain in the…anyway, I’ve prepared the following step-by-step quick guide which I believe should solve this problem for most users.
 
Common symptoms of this error
First of all, this error isn’t unique to this program or another; it usually occurs and may occur whenever you try to run programs such as Windows Media Player, Firefox, Winrar etc. Usually, Windows pops up an error message that indicates which programs caused this error.
Again, those are the most typical symptoms that most users run into with this error, however as you’ve probably already noticed, the Web is full of forum posts about various other situations where this error erupts.
Possible causes to this error
To make it clear – there isn’t one specific cause that I can point out that causes this Runtime Error r6002 Floating Point Support not Loaded, however, there are few factors that usually cause it to erupt:
(1) Virus or spyware infection
(2) Incorrect software installation or removal
(3) Corruption of program files
(4) Missing program files

Step-by-step repair guide
As mentioned earlier, there several common factors that cause this error, so let’s handle them one by one.
(1) Scan for viruses and spyware
Use a reliable anti-virus program such as Microsoft Security Essentials. It’s free (for anyone with a genuine Windows system) and I found it much more reliable than all the other free anti-virus solutions.
If no viruses/spyware were found then…
(2) Uninstall the related program
When Windows pops up that error message, see if it indicates a program name or a path to a specific program file. Once you identify that program – uninstall it!
In many cases it is MICROSOFT VISUAL C ++.
(3) Delete all that program’s related files and folders
If any files and folders that belong to that program are left on your HD –delete them.
Attention! Just to be on the safe side – before you do that, open a new folder on your desktop and keep a backup of those files and folders.
(4) Re-install the latest version of that program and restart your PC
If it was MICROSOFT VISUAL C ++ then download it from here .
In most cases, following these 4 steps should solve the problem.
If not, then there’s probably a problem with one or several incorrect/corrupt file/application paths, program shortcuts, etc.
(5) Detect the source(s) to this error
Use the following Windows errors scanner (free scan) to conduct an in-depth scan to your entire Windows system. By the end of the scan it’ll provide you with a detailed report about the various errors that it has detected.

Pinpointing problematic Windows OS configuration

Pinpointing problematic Windows OS configuration
Go over the list of errors - see if it has detected the source to this Runtime Error r6002 Floating Point Support not Loaded error.

 Enjoy frnds and if u  faces any problem then hit me a comment, i'll help u a soon as possible.

Tuesday 17 April 2012

Use Automatic Fixed Read More Jump Break With Thumbnail On Blogger

Add Auto Read More Post Summary's To Your Blog


Step 1. In your Blogger dashboard click Design > Edit Html > Tick The Expand Widget Templates Box


Step 2. Find the following piece of code in your blogs Html : (Click CTRL and F for a search bar .


</head>


  Copy the following code and paste it Directly Above / Before </head>


<script type='text/javascript'>
var thumbnail_mode = "no-float" ; 
summary_noimg = 430;
summary_img = 340;
img_thumb_height = 120;
img_thumb_width = 120;
</script>
<script type='text/javascript' src='http://pagination2.googlecode.com/files/auto_readmore_blogger.js' ></script>


Important


The code in red sets how the post summary's are displayed.Remember if a post has an image it will be re sized into a thumbnail to be displayed beside the summery.If the post does not have an image just a text summery will be displayed.


summary_ noimg= 430; --> The length of the summery if the post does not have a thumbnail.
summary_img = 340; --> The length of the summery if there is an image in the post that will be converted into a thumbnail.
null_thumb_height = 120; --> The height in pixels of the thumbnail.
null_thumb_width = 120; --> The width in pixels of the thumbnail.


Step 3. Find the following piece of code in your blogs Html : (Click CTRL and F for a search bar .

<data:post.body/>


  Replace <data:post.body/> With The Code Below


<b:if cond='data:blog.pageType == &quot;item&quot;'>
<data:post.body/>
<b:else/>
<b:if cond='data:blog.pageType == &quot;static_page&quot;'>
<data:post.body/>
<b:else/>
<div expr:id='&quot;summary&quot; + data:post.id'>
<data:post.body/>
</div>
<script type='text/javascript'>
createSummaryAndThumb(&quot;summary<data:post.id/>&quot;);
</script>
<div style='clear: both;'/>
<span class='rmlink' style='font-weight:bold;padding:5px;float:right;text-align:right;'><a expr:href='data:post.url' >Read more ... </a></span>
</b:if>
</b:if>

Your Can change the text in red From Image by Adding This Code. 
<div class='separator' style='clear: both;  text-align: right; margin-right: 5px; '>
<img border='0' height='31' src='Your Image url Here' width='150'/></div>
Note - You can change the text in red from Read More to "Continue Reading", "Read Full Post" or With Images Like This. Copy This Image And upload any image hosting site and paste image url in Code Above.
Now enjoy frnds. if u face any problem then hit me a comment i'll help you as soon as possible.

Change Older Post & Newer Post Text With Image Button


1. First if all make  Backup Your Template

2. go to your blogger Dashboard >> Template >> Edit html >> Proceed Make Sure you check the "Expand Widget Templates.

3. Find the following piece of code in your blogs Html : (Click Ctrl and F for a search bar to help find the code.


<data:newerPageTitle/>


Replace with this code.

<img border="0" height="50" src="http://4.bp.blogspot.com/-5KhhMJZ7N5A/T2TpPgm7kuI/AAAAAAAAA0Y/9X4ITsILU_U/s200/Previous+Icon.png" width="50" />


4. Find the following piece of code in your blogs Html : (Click Ctrl and F for a search bar to help find the code.


<data:olderPageTitle/>


 Replace with this code.


<img border="0" height="50" src="http://4.bp.blogspot.com/-eHAvMF8QzMo/T2TpOpHsrBI/AAAAAAAAA0Q/RWR2MurGnJQ/s200/Next+Icon.png" width="50" />


5. Find the following piece of code in your blogs Html : (Click Ctrl and F for a search bar to help find the code.
<data:homeMsg/>


 you have found 1 of 2. Replce 1 of 2 codes with this code.

<img border="0" height="50" src="http://2.bp.blogspot.com/-PJ9bQIARuyc/T2TpNnibfJI/AAAAAAAAA0M/cRHTnOFbbAk/s200/Home+Icon.png" width="50" />


and click save! Thats its
after then  refresh your page see  new look.
Enjoy frnd and if u having any problem then hit me a comment .


Thursday 5 April 2012

Hide Any Drive without any software easily

Most of you must have wondered if there exists a way without using software to Hide A Drive completely so that it cannot be viewed or accessed without unlocking it. so, here is a easiest method to hide drive simple 4 steps.

Follow The Steps For Do This..


1. Goto run type “gpedit.msc” (without quotes)


2. select user configuration —> administrative templates —> windows components —> windows explorer(click on it) 

3. On right panel search for hide theses specified drives in my computer.

4. Double click it mark on enable to hide the drive and select drive the which you want to hide. If u wanted to hide all the drives which are on your system then select restrict all drives.
to make it unhidden mark on disable option.

Enjoy this tricks frndsssssss

Friday 30 March 2012

Take Screen Shots Without Any Software


Taking screen shots is the most essential and common task for every bloggers. This task can be done by Snipping Tool of Windows 7. But XP users can't enjoy the benefit of Snipping Tool. That's why, this post is especially for them. From this post we will learn how to take screen shots without any additional software. We only use our keyboard and Paint to take screenshots. So, do the followings :
  • To take a screen shot just press Print Screen SysRq key which is the next of F12 key. Pressing Print Screen SysRq you have captured the screen. 

  • Now open Paint . To open it go Start and type paint in search box.
  • After opening Paint maximize the Paint windows and press Ctrl+V to paste the taken screen shot. Then save it.

Thursday 29 March 2012

Remove "Subscribe to: Posts (Atom)"

  1. Go to dashboard/ template/ edit HTML
  2. Click the 'Expand Widgets Templates' box
  3. Find:

<b:if cond='data:blog.pageType != "item"'> <!-- Blog feed links -->
<b:if cond='data:feedLinks'>
<div class='blog-feeds'>
<b:include data='feedLinks' name='feedLinksBody'/>
</div>
</b:if>


Remove this line:
<b:include data='feedLinks' name='feedLinksBody'/>
That should remove Posts (Atom).

Enjoy Frnds , have a nice day, if u faces any problem then hit me a comment, i'll help u as soon as possible.

Thursday 22 March 2012

Enable Right Click on Disabled Websites in Firefox

HI! FRNDS !! U  faces Sometimes some websites have blocked right click for many security reasons well obviously they know that its not a stealth secure but they just wanted to stay safe from some dummy scrappers but if you wanted to enable right click on disabled websites than you can do that with an easy add-on for Firefox which is really powerful for doing more web developing work but also provides you with an easy way to enable right click.


web-developer-add-on-firefoxUsing Web Developer Firefox Add-on

Web developer Firefox add-on can do your job really easily with its all JavaScript's disabling feature that works really well on any webpage. So now you just have to install Web Developer 1.1.9 Firefox add-on and than you have to go to Disable > Disable JavaScript > All JavaScript and that’s it your website will load with all the JavaScript's turned off and than you can use your right click and do any stuff without letting the administrator know about that thing.

So I hope this will cleared to you and now you will be able to use your right click on any website,  enjoy frnds with lovely smile.. keep visithing..

Add Background Music in your website

hi !frnds today i m going to tell about how to add music in Blogger Blogs or any other websites. when any one visit in your website Well music plays a very important role in any persons life, when you are sad simply tune in some music and your mood will get ok. So many bloggers out their want to add some background music on their website so Musicthat readers and visitors can be amused and their reading experience can be more delightful.
So we will be showing you how to add music in the background on your website, off course its not as simple as 123 well you will need to convert your song into .swf file and than upload it to file hosting service from which we can access that song from anywhere.
For the conversion purpose we will be using the Hootech SWF Converter software with this software you can simply convert any song into .SWF File by simply hitting convert button. After conversion is done we will upload our file to Dropbox ( best file hosting service ) and embed into the flash code and add it to our website.

How to Disable Dragging in Blogger Website

BloggerDisabling Drag option can come handy when you want to protect your unique work from the robotic copiers and others whom you do not trust. So with this simple hack you can disable mouse dragging so person will not able to drag text and images on your website hence giving no chance for copying well he may get some alternate way to copy out the content .

Follow below steps :

1. Go to Blogger.com

2. Navigate to Design and than Edit HTML

3. Now press Ctrl + F to open the search feature and than search for <body tag.

4. Now you will see <body with a something more code after it so you have to paste the below code right after it which will make code look like in the image below.
Disable Mouse Dragging Blogger
ondragstart='return false' onselectstart='return false'
6. Now just click save template and click view Blog and check out if this small code is making wonders or not well it works perfect as I was using this same thing to protect my blog from scrappers but due to many request to disable it from my blog I did it now but it’s a great way to protect your blog so have fun :)

Trick to Get your FeedBurner Subscribers Count Instantly

A really simple and helpful hack to get to know your Feedburner subscribers count instantly. Sometimes you do not have any badge embed on your website as a chicklet for your Feedburner Feed and you really wanted to know the exact subscribers your have on your feed till present, well so the one way is to get subscribers count from your Feedburner account by signing in to your Google Account or we have another simple method to do this using a small url trick.
So now this hack works simply by copying and changing the below url and adding your FeedBurner username to it so like I have done in the below url if you check the below url you will see a simple chicklet image displaying my Feedburner subscribers count.

http://feeds.feedburner.com/~fc/YOUR-USERNAME-HERE


So you simply have to manipulate the above url with your own Feedburner Username and than paste that url into your browser address bar and that’s it you will get your Feedburner subscribers count like above in the image.
So this was the simple trick to get your Feedburner Subscriber Counts instantly without logging into your Google Account..

Enjoy Frnds

How to Disable Right Click in Blogger Blogs

Disabling right click in Blogger websites is really easy as it does not need any technical knowledge you simply have to copy and paste some script into your <body> and that’s it everything is done.
Now why will anyone want to disable the right click in their website,Well there can be many reasons but the main reason which comes to anyone's mind is the content copying and the page source viewing well there are many another ways to view the source or copy content as you can see on my website I had also applied this script earlier which disables the right click on website but recently I just removed this script as many people were having problems.

Follow below steps .:

1. Go to your dashboard in Blogger.com
2. Now click Template and than click Edit HTML, now click on Proceed.

3. Now simply copy and paste the below script right before the </body> tag.
&lt;script language=javascript&gt;
&lt;!--

var message=&quot;&quot;;
function clickIE()
{
  if (document.all) {
    (message);return false;}
}

function clickNS(e)
{
if (document.layers||(document.getElementById&amp;&amp;!document.all)) { 
  if (e.which==2||e.which==3) {(message);return false;}}
}

if (document.layers){
  document.captureEvents(Event.MOUSEDOWN);document.onmousedown=clickNS;}
else{
  document.onmouseup=clickNS;document.oncontextmenu=clickIE;}
document.oncontextmenu=new Function(&quot;return false&quot;)

// --&gt;
&lt;/script&gt;


4. That’s it now click on Save Template Button, now script is up and running on your blog just check it out refresh your blog and try to right click you will not be able to do that, ask your readers to do this thing.
Have Fun :) Guys and now enjoy secured blog.

How to Change Cursor in Blogger Website

Cursor can play very important part in customizing your Blogger Website well after templating everything from posts to ads its time to customize the Cursor. Well the trick I will tell will help you to change your cursor @ any time by just uploading a image file and changing the links weather you want to write your own name on cursor or want to put a Heart for a loved one its your choice so follow the below guide and have FUN.
Follow the Below Steps to Change Cursor Shape .:
1. You need to go to www.Blogger.com
2. Sign in with your Blogger account
3. Go to Dashboard than Design
4. Open Edit HTML
5. Now click ctrl + f to open the search feature
6. Search for </head> tag
7. Now paste the below <script> right above </head> tag
<style type='text/css'>body, a, a:hover {cursor: url(http://safir85.ucoz.com/bdlab-blogspot/COOL_GREEN_POINTER.cur), progress;}</style>
9. After pasting just click Save Template and check your Blogger Blog with a new fresh Cursor which mover according to your Will Muhahahhha… Just Jocking So Enjoy This Cursor Changing Trick.
Customization Part .: As in the above <Script> Section you can see the .cur URL which is grabbing your new cursor from that URL now if you want to change your cursor than juts change that URL with another one and that’s it your cursor is changed again.

Create Your Own Custom Search Engine For Your Website

hi guy today i m going to tell u about that how to create your custom search Engine for your website.i hope you really enjoy it Follow the below steps for do this ..

1.First you Go to this site Click Here 

  • Click on Create a Custom Search Engine

  • . and then login with your gmail account

  • on the Site to search you can add any address that you want

           like rapidshare.com , Megaupload.com, Hotfile.com

           and remember put * mark before the site name

           eq : *.rapidshare.com

  • Check on I have read and agree to the Terms of Service. and then click next

          try it. and then click on finish

  • for more better result you can add any keyword that you want

           like .zip .mp3 .rar .3gp .wma .wmv .avi .mp4 .pdf .mpg, by going to the control panel

Enjoy Frnds and keep visiting..

Monday 19 March 2012

Remove The Attribution Widget

HOW TO REMOVE ''POWERED BY BLOGGER''
 frnds u want to remove attribution widget then just follows these few simple steps. after removing u must feel good na ?? lets come........
  •  Go to Design > Template  > Edit HTML. Before you do anything, download a copy of your blog (you should always do this before experimenting... just in case...)

Friday 16 March 2012

Domain Availability check

guyz u want a domain???

check your desired domain availability click here

Remote Access & Destop Sharing

hi guyz today i m telling about how to share our destop with our frnds or worker .
Remote access and desktop sharing is very useful in today's world.
You may access your office computer by using your home computer and vice versa.
You may transfer files, can fix errors and can do anything. The remote system screen will appear on your screen and you will have the power to control the remote system by using your mouse and keyboard.
Its a magic.

Just download click here 

License: Free for home users

Submit Your URL/Website To Google and Other Search Engines

  •  Do you want to add your site to all popular search engines?
  • Do you want to see your site in google searches with best position?
  • Do you want to get more traffic to your site?
  • Then you are at the right place.

Saturday 10 March 2012

How to add contact us page in your blog


Sign up for a free account at emailmeform
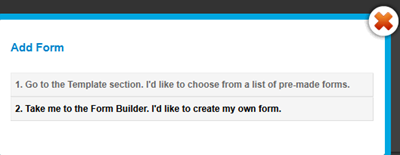
Once you are registered click the "Add a Form" button and choose the form builder option.
add form
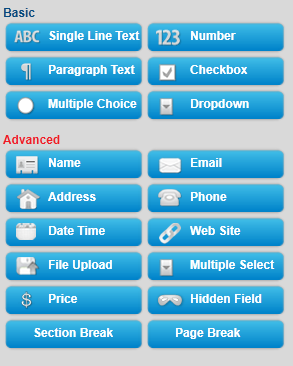
Keep your form simple with some important fields only like Name, Website URL, Email, Age, Country, Subject and Message. The form builder looks like this,
form builder
The form builder has blue buttons at left and display at right. When you click a button on left the effect is displayed on right. Now kindly follow as I instruct for keeping things simple and for creating a simple but informative contact form.
Follow this order:

Thursday 8 March 2012

How To Remove "POWRED BY BLOGGER" From Bottom Side of Blog

Go in to 'Edit HTML' (under the 'Design' tab).
Search through the HTML for ".footer-outer"
after then  add HTML bellow "footer-outer"

/* Footer
----------------------------------------------- */
.footer-outer {
  margin: -$(shadow.spread) 0 -1px;
  padding: $(shadow.spread) 0 0;
  color: $(footer.text.color);
  overflow: hidden;
display: none
}
AFTER then save template.

Wednesday 7 March 2012

How To remove the Powered by Blogger from your blog


How do I remove the Powered by Blogger from my Blogger blog?
In order to remove you will need to edit the blogger template and delete the attribution widget.
Please backup your blogger template before you make any changes to it. This helps to revert back to the original template when something goes wrong while editing your template.Just Download your Template

Steps to remove the Powered by Blogger text from your blog:
1. Go to Blogger Dashboard. Click on  Layout. Click on the Page Elements tab for your Blog.
2. Click on Edit HTML and select the Expand Widget Templates checkbox.
3. Press CTRL+F And Search for Attribution widget.

Remove the selected code from your blogger template carefully.

Monday 5 March 2012

How To Find Your Product Key In Windows XP, Vista and Windows 7

hi!!! GUYZ
In this tutorial we will look at how to find your product key for Windows XP, Vista and 7. Normally your key will either be displayed on the Windows installation CD sleeve or on the top/ bottom of your desktop tower or laptop. However, over time these either get lost or become unreadable. The version of the product key that is stored in the registry is encrypted for security reasons, so it won’t be of any use to you, should you wish to do a reinstall, which is where 3rd party programs come in. For this particular tutorial we will be using Magical Jelly Bean Keyfinder (v2.0.8) which is the free version (clean and virus free) and works on 32bit and 64bit versions of Windows XP, Vista and Window 7. It will also find the keys for MS Office (not tested on 2010) as well as other programs. Below is a list of what it won’t cover, but the paid for version ($24.95) will: 
  • Recover serials for Adobe CS2-CS5 products
  • Recover serials for Office 2010
  • Scan remote computers
  • Scan Vista virtual store
  • USB install support
  • Auto-updater and technical support

How To Resize Images Quickly Using Free Software

This is a very simple way to either resize a batch of images (JPEG or Bitmap) or just one.

Image shrinking is done using pixel-averaging, which gives much higher quality than sub-sampling. Image enlargment is also done using pixel-averaging, unlike most other image editing software. The resizing algorithm produces high quality images because it uses all available information from the source image. Most other image resizing software only use a small amount of information from the source image.
It’s Free Software, so any one can use it. (not Freeware as that includes a licence) You can download the program here. Just unzip it, dump the program on the desktop or wherever and double click on it to view the ‘ReSize’ window. The Icon for the program will look like this

Sunday 4 March 2012

How To Capture Screen Shots Easy

 hi! guyz today i m telling about how to capture  screen shots easly by using a software.
it is very important tool for bloggers

 You can download the program here. It’s 581KB in size (unzipped). Just unzip the program and double click on the Capture.exe icon


You will then see the Capture icon appear in your task bar. To use it, just right-click on the icon where it will give you the option to capture an image to file (the choice I use) or capture to the clipboard.

So let’s say that you want to capture the Google logo. Simply right-click on the Capture icon, select ‘Capture to file/ Clipboard’. You will then see that your cursor has changed to a cross-hair, now just drag-select the area you wish to capture and release.


You will then be prompted by the Save As window asking you which format you want to save to. By default it’s set to PNG which is a lossless format. You can save to PNG/JPG or BMP. It will remember your last preferred choice of image format.


That’s it. A simple and easy to use screen grabbing program that is free to use and will save you a lot of time, and cuts out the hassle of having to crop out the area you actually want from your screen grab.
This is a great tool for bloggers

How to Fix a NSIS Error

If you get the NSIS error while installing software on your computer, then the software has failed the integrity check, and is either corrupt or damaged. A virus on you computer may have corrupted the file. To overcome this problem, update your anti-virus software and scan your computer for viruses.

1- Go to "Start," click on "Run," type "cmd" in the text box, and then click on "OK."
 
2- On to the black window that opens up, click and drag the software installation file icon that you wish to install. For example, suppose you want install Google Talk on your computer and the setup file (googletalk-setup.exe) is stored in the "C:\\Software" folder. Click and drag the "googletalk-setup.exe" icon from the Software folder, onto the black window. Once you have dragged it, the entire path (C:\\Software\\googletalk-setup.exe) shows up on the black screen.

3- Press the spacebar on your keyboard and type "/NCRC". In our example, "C:\\Software\\googletalk-setup.exe /NCRC".
4- Press "Enter." The setup program will start now.
 

Tips & Warnings

 Even after following the above procedure, if the installation still does not start, then the installation file is damaged. Download a fresh copy of the software and try again.

Saturday 3 March 2012

How to create a facebook fan page for your blog ?

As you all know, Facebook has grown into the biggest social network over the years.  It has nearly 600 million users. If you have a blog, it will definately help you to promote it through facebook. It can really help to drive targetted users to your blog, if done skillfully. The best start will be to create a facebook fan page for your blog. A facebook fan page will help you get visitors, subscribers & also, if you got good number of fans, it will help you drive advertisers to you site as they prefer blogs with good number of facebook fans & twitter followers.So on the whole, just like a good pagerank is important for a blog, a facebook fan page with many fans is also important & essential for a blog. On the whole, a Facebook fan page depicts the reputation of a blog based on the number of fans & design.
How to create a facebook fan page for my blog ?

1. Login to your facebook account. You must have a facebook account if you want to create your facebook  fan page. If you don’t have one (oh, in which world are you living then), you must register at facebook.
2. Now go to this LINK . You will see some categories as shown in the picture below :
facebook fan page How to create a facebook fan page for your blog ?


Click on ‘Brand or Product’.
3. Now you will be prompted to choose a subcategory & a name.
For subcategory, scroll down on the drop down menu and choose “Website”. On the next section, enter the name of your page..
4. Upload a photo to your Facebook Fan Page.
Facebook fan page 300x98 How to create a facebook fan page for your blog ?Try to make a cool photo as your blog’s profile image on your facebook fan page as the profile image will be the first thing to attract new fans.
5. Add information about your blog’s Facebook fan page.
Click the “Info” tab and then “Edit Information” on the right.
Facebook fan page edit info How to create a facebook fan page for your blog ?
Type in the relevant information including the date your blog was founded, the URL, and an overview. Try to provide more & more info about your blog as you can.
6. Write a catchy caption about your blog.
Click the link under your profile image that says ‘write something about ‘yourBlogName’. Now add an short attractive caption here, which describes what is your page all about & why one should become a fan of it. This will really play a great role in increasing your Facebook fans.
7. Final step
Finally remember to become a fan of your newly created facebook fan page of your blog by clicking the ‘Like’ button . Now try to  suggest your page to as many of your friends as possible. Once you get 25+ facebook fans of your blog, you can get a vanity url of your page by clicking HERE. A vanity url will be of the type facebook.com/yourBlogName.

How To Create A Fevicon

If you are into serious blogging, the first thing to make your blog look professional is to have a favicon for your blog. It will add many benefits to your blog. The blog will look descent, genuine & of course, cool !! 
favicons How to create a favicon for your blog ?

What is a Favicon ?

Some of you may be wondering, what exactly is a favicon. Favicons are small logos or icons that appear in your browser on the location bar or address bar where the title of the webpage is written. Check the image below of my blog’s favicon for instance :
Favicon How to create a favicon for your blog ?
Now you might have got what is a favicon.

How to create a Favicon for a WordPress blog?

In order to create a favicon for your self hosted WordPress blog , you will need to follow the following steps :
1. Create an image (in paint or photoshop) that is in the ratio 1:1 & save it to your hard drive.
2. Now visit CLICK HERE & upload the image, that you created in step 1, & click ‘generate Favicon’ after choosing 16×16. It will generate a 16×16 .ico image file of your <b>favicon</b>. Download the generated file & save it with any name on your computer..
3. Upload the file where you have hosted your currently active WordPress theme. The path must be something like /blog-path/wp-content/themes/current-theme/favicon.ico. Upload another copy of this file to the main directory of your site (this will enable feedreaders to display your favicon).
4. Now go to Theme Editor from wordpress dashboard & edit the header.php file . Add the following below the <head> tag :
<link rel=”shortcut icon” href=”<?php bloginfo(‘stylesheet_directory’); ?>/favicon.ico” />
5. Save it & its done now. Now you will be able to see your favicon on your browser’s address bar , whenever you will visit your blog.

How to create a Favicon for a Blogspot blog ?

If you have created a blog on blogspot, then follow following steps:
1. Create & save .ico image (See step 1 & 2 in wordpress case above)
2. You now have to create a post in blogspot & upload your .ico favicon image here. Don’t publish your post, just click preview & from the preview page, right click on the image & select ‘copy link location’. So now you have got the link to your favicon image hosted on your own blog.
3.Now go to Layout–>Edit HTML in your Blogger template. You do not need to check the “Expand widget templates” box.
4. Search for the </head> tag in your template using your browser’s search function & immediately above that, paste the following code :
<link rel=”icon” href=”http://yourblogname.blogspot.com/myicon.ico” type=”image/x-icon” />
<link rel=”shortcut icon” href=”http://yourblogname.blogspot.com/myicon.ico” type=”image/x-icon” />
Replace ‘http://yourblogname.blogspot.com/myicon.ico’ with the url you copied earlier. Then save your template. Now when you view your blog in your browser, you should see your favicon appear beside the web address and in the bookmarks folder (if you have bookmarked your site).
That’s it. You can see how easy it was to create a favicon for your blog

 some free websites links which provide free fevicon generator

1 - click here
2 -  click here
3 - click here
4 -  click here
 

How to add feedburner email subscription to my blog

You might have seen lots of blogs are using email subscription option to their readers. It can happen that your friend using feedburner email subscription widget to his/her blog, and you are looking for a help to add email subscription option to your blog.


I'm guiding you about adding an email subscription widget to your blog from feed burner. These are easy steps to follow.

1) First of all and before anything, you'll need a FeedBurner account. To create an account, just click here. If you have already google account, that case it will be easier for you. Otherwise you can use other email address to open an account from FeedBurner.

2) If you are a new FeedBurner user, you'll need to burn your feed first.


3) Now you have burned a feed for your blog. Usually you'll not require to follow this step. It will automatically take you to step 4. But still if not, that case just click on your feed title, it will look like as below image.


4) Now click on the publicize link from your feed burner dashboard.


5) From the left side of the page, you'll find a link "Email Subscriptions", click on that.


6) Now you'll see a piece of code like below. Just copy the code, and place at your blog. You can even select your blog type like (Typepad, wordpress, blogger) and it will automatically take to widget option for corresponding blogs system.


You have the email subscription widget to your blog now. From your feed burner dashboard, you can change the email preference, email from address, and many more option, which is located just under the "Email Subscriptions" link.

How to add a logo to your Blogger/Blogspot site

Below are the step-by-step instructions to add one of the Quilting Gallery site logos to the sidebar of your Blogger/Blogspot site.
How to put a logo with a link in the sidebar of your blog:
  • Open your blog in blogspot.com.
  • Save the picture or logo on your hard drive.
  • Click on the "Design" button on the top of your blog.
  • Make sure you are at layout page, or click on layout to get there.
  • Click on add a gadget.
  • Then choose "add a picture".
  • You can put a title above the picture in the first field.
  • In the field link you type "http://quiltinggallery.com/" (minus the quotes).
  • In the field picture you click on from your computer and then you click on search and search for the logo/picture that you saved on your hard drive. Click on it, it will show, and then you click on save.
The logo will be put on top of your sidebar, you can pick it up it and put it wherever you like it. When you save the page and open your blog you will see the logo and if you click on the logo it will bring you to the page you linked above.
How to add the block of code, without saving the image first:
  • Open your blog in blogspot.com.
  • Click on the "Design" button on the top of your blog.
  • Make sure you are at layout page, or click on layout to get there.
  • Click on add a gadget.
  • Choose HTML/Javascript.
  • Copy the code from this page and paste it in the block and save.

How to Remove or Hide the Blogger Navbar?

How to Remove or Hide the Blogger Navbar is one my question I ask when I see a navbar on my blog. It's really hate to see it. I know some bloggers also want to remove or hide the blogger navbar but not all bloggers don't liked it.


Since blogger platform has their new version of their site. Some are very confuse where is the template, how to restore and upload new template your blogger site. Now, let me teach you how to remove or hide the blogger navbar in your site in new version og blogger. As you can see the old version the color are blue and orange not it's totally plain. Hehehe..For me it's nice to no blogger navbar if you host your own domain.

How to remove or hid the blogger navbar?


1. Of course, you need to log-in to your account.


how to remove blogger navbar
click to enlarge

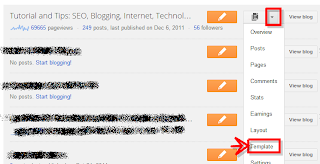
2. On you blogger dashboard >> click the 1. to show the drop-down menu then click the "Template"(2). Refer to the image above for reference.


3. Click "Edit HTML"

4. Click Proceed and don't forget to click the "Expand Widget Templates"
click to enlarge
5. Copy and Paste the code below and insert to place (CTRL+C) to copy and (CTRL+V) to paste

#navbar { height: 0px; visibility: hidden; display: none; }
6. Paste on the template as shown below
click to enlarge
7. Save the template and you're done! Very easy right?
Just remove the code to view the blogger navbar again

Trick To clear your sensitive information on system shutdown

In some operating systems use memory hard disk, called virtual memory. During processing, the operating system to transfer some data and programs on your hard drive and RAM to be downloaded again if necessary. Data or programs stored on the hard disk in a temporary file called a swap file. This technical exchange of data in memory and hard disk is called paging. Operating system spends a lot of paging time, instead of implementing the state of application software. But the problem is that you are working on different programs on your computer and the page file may contain confidential information or not is stored in an encrypted format. To reduce this risk, you can set the page file on your computer to automatically clean every time the computer turns off.

Follow these steps to delete the page file system automatically.

To enable this feature, log into your computer with administrative rights.

Now click the Start button to open the Control Panel and click here on "Administrative Tools" option.

Now "Local Security Settings" panel on the side of the raised panel click on "Local Policies".

Now click on "Security Settings" double-click on "Shutdown: Clear virtual memory paging file" option.

Now the small dialog box appears with the options "on or off," the page file.

Select the "Enabled" radio to clear the page file each time you turn off the computer.

save the settings, click Apply, then OK to finish.

Make Someone's Internet Explorer Crash Everytime

Here is a fantastic prank for you.
Make Someone  Internet Explorer Crash Every time when he open Internet Explorer.
So let's begin.
first of all open the settings window.
Now configurate it.make the homepage http://crashie.com.
Now, now, every time he open Internet Explorer, it crashes. This means that you can not change settings that means you can not go on a website forever! because Internet Explorer is screwed and  can not download other browsers that are not screwed.
How can I fix it?
about it, you must disconnect from the Internet.
Go to control panel and switching to Classic View. then go to network connections. Then right click on the icon (s) and click Disable. Or just pull the cable internet

then go to Internet Explorer and change your homepage so it's not crashie.com because there is no Internet.

How To Shutdown Someone Computer(Prank)

Today I will show you how to use a desktop shortcut for make prank your friends.It enough to turn off the computer when they click the shortcut, and they think there's going to open Internet Explorer. It will not harm your PC in any way, or delete files.

To do this Prank

Right click on the desktop, click New, then click the shortcut

A new window will Appear.
Now write this entry: shutdown-s-t-30
You can change the number if you want.

Click next.

Now Name this shortcut INTERNET EXPLORER.
Now Click Finish.
Now costumize it.

Disguise

Right click on the icon.

Now you want the costume so it looks like Internet Explorer to do this, simply:

Right-click the shortcut and click Properties

Now go to the Shortcut tab and click Change Icon,

Just find the Internet Explorer icon and select it,

Now click Apply and OK.

That's it.

Free Calls To USA, Italy, United Kingdom, China, India.

Guys,how to make unlimited pc to cellphone,mobile or mobile calls.
Mobile to mobile  trick is only for the 3G costumer.
How to make free calls?
ok lets start
first of all just visit this website-http://www.wimobile.it
sign up here free,make a free account.
A email verification mail you will get.verify it.
when u verified your mail,you will another mail containing your user id & the password.
You can use these credentials to login using SIP dialer or WiMobile application.
You can download it from this url-
http://www.wimobile.it/eng/index.php/download
symbian mobiles user can direct download from-http://www.wimobile.it/archive/sym/Wimobile.sis
For the your system use any voip providers,such as http://blog.voipsupply.com/free-sip-softphone-roundup
Now How to configure WiMobile on your PC SIP?
How to use WiMobile free calling on PC?
Now you have to download any sip client.you may use zopier for pc.
Get it from here-http://www.zoiper.com/softphone/classic/
Now you have to configure it manually.
User name - you got in email
password - you got in email
Server SIP.WIMOBILE.IT
Dial the number in international format-for India +91 Mobile number.
free sip softfones list for pc check here-http://blog.voipsupply.com/free-sip-softphone-roundup
NIMBUZZ :-Now at nimbuzz goto sip &amp;amp;amp;amp;Other&amp;amp;amp;amp; user name: Your wimobile Phone Number@SIP.WIMOBILE.IT
Eg:-4432*111@SIP.WIMOBILE.IT
Password =Your Password.
Proxy Server SIP.WIMOBILE.IT
 Done.
Next, select the SIP VoIP Out
NOw you may make Call Any Number From Nimbuzz DialPad .

How To Keep Your System Always Clean

Friends in this post im recommending a powerful application to keep your equipment in good condition.

WinMend Registry Cleaner is a registry cleaning and a powerful and secure application optimization. It has nice functional modules: Registry Optimizer, Registry Cleaner, Registry Backup and Scheduler. The application can efficiently and full system scan, to pinpoint errors and obsolete data, safely edit or delete them, thus effectively reducing the workload on your computer and improve the speed and performance of your system. It also analyzes the various system parameters such as CPU, memory, disk and offers a complete, automatic system optimization solutions to further increase the speed of starting the operating system. The analysis of safe, complete registry scan and faster scan engine is our powerful tools for registry cleaning and optimization.

Regular scan

When you add files and applications on your computer, or make configuration changes, the registry grows and the system slows down. Cleaning the registry on a regular basis to keep the system running smoothly. WinMend Registry Cleaner planning is to help determine cleaned regularly.

Full Analysis

Dozens of categories, and to scan more than 10,000 points of data checking WinMend Registry Cleaner is the most comprehensive and deeper correction of the register and cleaning applications.

Quick Review

This application has been optimized specifically for Windows 2000/XP/Vista/7 (32-bit and 64-bit) and its scanning speed is significantly improved. It only takes a few minutes to completely scan your Windows registry.
DOWNLOAD HERE .

Windows 8 Secret Tips&Tricks

Get the old style panel Windows Setup

What happened to the Windows Control Panel in Windows 8? It seems to have disappeared. Start button in the menu, no desktop, including the Control Panel. Sure, there are app Metro Control Panel, but does not contain all the detailed control, and features old-style Control Panel, and also does not allow you to change the desktop.

You can go to Control Panel Roman relatively easy, though. In Metro-interface, click Control Panel, scroll to the bottom of the screen and click Settings, and you will be sent to the control panel desktop in all its splendor of Rome.

Metro Image

You want to capture a screen or application metro? If you try a Windows desktop screen capture program, it may not work --- hot press to capture screen and nothing seems to happen. Here's a solution. Press the shortcut, then get the metro service and click on the desktop. At that time, will return to the Metro that I wanted to capture, and display their catch spring program in action --- at least that's what happens to me with Snag-It.

Not yet a more difficult. When you're inside the application tube, place the mouse cursor at the bottom left of the screen and click the Share button. After that you will be asked to share a screenshot using Metro social application on Facebook. This technique does not work underground and the main interface does not necessarily work for every application.

App fast switching between Metro and Office Apps

There are several quick ways to switch between open programs, even if they are a mixture of applications and desktop applications Metro. By pressing the Windows key + Tab will do. But if you want to switch between applications without using the keyboard, you can do so. Move the mouse cursor to the far left of the screen and a small icon appears on the last run app. Click it and change you.

Metro cabin to applications

Metro to run an application, and you will notice something missing --- there is no apparent way around. Usually, this is not a problem, just let it run in the background. But there are times when a meter open application can lead to the deepest part. For example, zero gravity has a soundtrack application designed to set the teeth on edge. Switch to the application, and the soundtrack is still playing.

There is a simple solution if kludgy. Back to the main underground interface and click on the office floor. This will change on the desktop, and the music stops immediately. The application will run for a minute or two, but the sound is off. But after a short period of time, the application itself will stop.

How To Share Files Directly Pc To Pc Without Uploading Anywhere

Guys in this post i m introducing a new website,who allow us to share & send any kind of file without uploading it anywhere.

You may send or share files browser to browser.

To do so,visit the www.filesovermiles.com

Here click on the browse & select the your desire file,you want to send or share.

When you select the your desired file,this website will auto generate a unique URL,which you have to share with the user to want to send the file to.

2 users: the host PC for file transfer is to go to this unique URL that looks like download option from file transfer from PC to PC.

File transfers are still available for download until the web page in the browser for the first time the user closed.

This allows you to securely transfer files of any size to another computer through the browser. No need to download the file anywhere.

How To Protect USB Drive From Virus

Have you attached a USB port to a computer and later discovered that the disk is infected with a virus? I certainly faced this situation several times. If you plug your USB drive to the infected computer the virus is transferred to the player in a short time to infect all important documents in the USB drive too, depending on the type of virus that you can lose important data from the USB drive and never give them back. But there is a solution to protect your USB drive against viral infections when plugged computer.If already infected you make your USB drive mode is not writable, the data can not be written, which means that if a computer infected with viruses are transmitted the virus to run, it will not be able to because the USB drive is write protected.

thumbScrew

download it from HERE
Thumbscrew a freeware program that allows you to write protect your USB drive, so viruses, malware, Trojans or any other type of infection of the host computer would not be able to write something on your USB. usbNow right-click the System icon tries andchoose Makes USB read-only. This would make the USB drive write-protected, making it completely protected from infection to spread on your disk.

Create Invisble Folder Without Name In Windows 7 And Vista

Windows 7 and Vista allows you to create an invisible folder without logo and NAME.S you private data and want to hide the look piracy without using external software, then surely you will benefit from this post.

BitLocker encryption utility

In this post we will protect the information placed on it for the first time an invisible folder and then hide it so no one could even accidentally open the folder.So This gives you two hedge.

How to create a folder without name in Windows 7 and Windows Vista?

1. Click the Start button on the taskbar

2. Finding the character table

3. Map of open and click on the coloumn blank

Invisble trick chracter create a folder without name in Windows 7 and Vista

4. Now, Select, and then the Copy button (now you've copied a space)

5. Create a new folder and rename it and press Ctrl + V on your keyboard.

At this point, we created a folder without any name.Now we create a folder without logo.

Create a folder invisible Invisble trick with no name on Windows 7 and Vista

How to create invisible folder on Windows 7 and Vista?

First Right-click the folder you created without a name in the previous step.

2nd Click Properties&gt;&gt; Customize&gt;&gt; Change Icon

3. Now you can get pop-ups of various vacuum icon.Select Icon

Display Invisble trick Create a folder without name in Windows 7 and Vista

4. Click OK

So far, you've created an invisible folder without the logo and the name is not.

Move all your private information in an invisible folder.

How to hide folder invisible to Windows 7 and Vista?

First Right click on the folder invisible

2. Select Properties, and now Hidden check.

So far, you have an invisible folder without your logo, name and hidden.So that only you can access this folder, only to have the information stored in this folder is invisible.

How to open this folder hidden?

1.First make your hidden files, folders visible from folders in the Control Panel.

2.Now Go to the drive (location) on your computer where you created the file without name and press Ctrl + A icon.Now, your file will be highlighted.

Just open it.

Download the BitLocker Drive Encryption, utility by the Google search .